Tools
Begin by getting the necessary tools. You’ll need:
- The gauge itself (the type is irrelevant)
- Open-ended wrenches
- Teflon tape
- Power drill
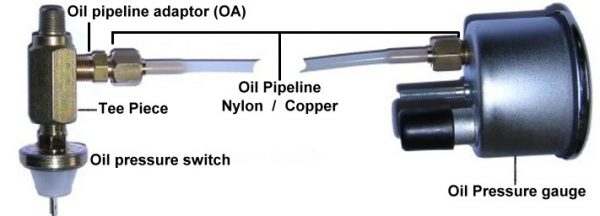
Begin by attaching the oil line itself to the gauge. Use a wrench to tighten the fitting and use the tape as needed to secure metal parts together. You’ll need to determine where to mount the gauge itself in your engine A-pillar (the vertical supports for the windshield); so long as you can see it from the driver’s seat, you can position it wherever is convenient and practical.
Ground It
A pressure gauge needs to be grounded, or else the static charge from the engine will build up and build up until it releases a particularly nasty shock. To prevent this, ground the gauge wire to a part of the car that will not be affected by electrical current (do not ground it to the engine itself, or to any areas that have contact with oil or gasoline). To ground it, make an eyelet from the wire and bolt it to a metal surface on the interior of the vehicle that does not have any paint. Splice the power wire for the gauge into the wiring harness, or simply cut the wires and tape them together.
Connect It to Engine
Once the gauge is properly mounted, it’s time to connect it to the engine itself. Thread the wire through the vehicle’s firewall and into the engine bay. Do not cut a new hole in the interior to thread the wire, since this can adversely affect the engine performance. Instead, find an existing line that the gauge wire can piggyback on. If necessary, use this same line to run the wire to the vehicle’s sensor so that low-pressure alerts will display as a light on the dashboard.
Connect it to Oil Line
Finally, attach the gauge line to the open end of the oil line. This port is usually located about six inches behind the oil filter itself. The oil pressure switch is usually silver in color and has two wires running to the electrical connector. Use the Teflon tape to seam the gauge line and the oil line together and prevent any leakage. Once you thread the fitting into the block itself, the gauge will begin to read the pressure as soon as you turn on the engine.
Remember that the oil valve will switch off if at pressures lower than 5 psi. This is much lower oil pressure than is healthy for a functioning engine, meaning that you will need to change the oil if it reads a low pressure after installing the gauge. Other concerns are oil leaks: run the engine for several minutes after changing the gauge to make certain that none of the connections have tapped any engine oil.
For visual aid, click here and check out this detailed video.

 Live Chat


